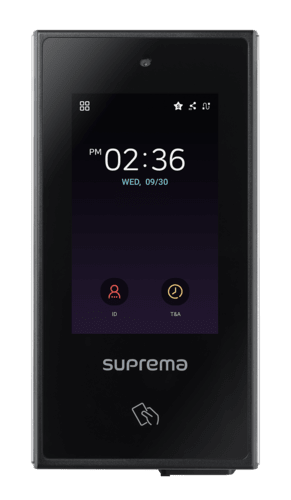
XStation 2

Camera
The X-Station 2 camera can be used for the image log on Biostar 2. Or can be used for the new feature that has been release with the 1.2 firmware, Camera QR.
This is a licensed feature that can be purchased for £60 and will allow the device to read QR codes from the camera. This adds a new level of authentication and capabilities for the X-Station 2.
LCD
The X-Station 2 is apart of the new generational devices featuring an LCD screen, the LCD allows you to completely program the device as a standalone device. The admin menu is accessed through this screen and configurable, allowing you to set authorization mode, users, door configuration and more.
The LCD will also show the connection status of the device such as an ethernet connection, slave connection etc.
Card reader
Card RFID reader, all devices can be used as a card reader. they either use standard Mifare cards or DesFire ev1/ev2/ev3.
some of our readers can also read the HID card type with the A reader version XS2(device) - APB(type) These cards feature HID IClass cards, HID Seos cards etc.
Type C connector
Like all of our touch screen devices, these feature a phycial connection for upgrading the devices firmware. This is using the included type C connector at the bottom.
This can connect a USB to the device that holds the firmware, then the user can access the firmware in the admin menu and proceed with a firmware upgrade.
User ID
User ID is used for when customers want to use an ID + pin to gain entry to the system.
This is a setting used within Biostar 2. This can only be set to ID + Pin as this will uniquely identify the user for 1:1 matching.

Time and Attendance
Time and attendance is used to clock-in/clock-out users for their shifts.
This function tracks all user data for reporting for payroll like Timeware and Sage pay.
These function are to be created and edited using the Biostar 2 software, for full customization head to Support.supremainc.com for in depth training on TNA
Icons
These Small icons represent the status of the device:
The star is to represent that the device has a connection to a server, this can be useful when trying to figure out if the device has a connection to an unknown server when trying to setup the device.
Ethernet Icon: The symbol that is a squiggly line, this indicates that the device has an ethernet connection.
RS Icon: This is for RS-485, this represents the device has a slave connection. This can be for being the slave device or having a slave connected.
If there is an X on the images then it means the device has either failed or cannot make the connection
Admin Menu
These 4 squares are the Admin menu of the device.
The admin menu is where the device can be fully configured, authentication mode, networking, logs, users, adding faces etc. The device can be used as a standalone device for sites. Intercom can be configured and RTSP as well.
This menu must be locked to stop anyone accessing it from default. This can be done either through Biostar 2 or the admin menu. Head to the user list and select the user you wish to be the admin, select them and there will be an option at the bottom for operator level, select admin and apply.
All devices with an LCD screen have access to an administration menu.
This admin menu allows almost complete customizability with the device, this include setting up standalone doors and access points, intercom functionality, wireless capabilities, RTSP feeds, user accounts/credentials and administration.
adding a slave devices isn't possible unless you use the device in Biostar 2


